

Other studio jobs...
Building stuff anyone?


I’m writing this with another day of April showers in the forecast. Can’t wait for those May flowers to show up on Monday!!! This week I thought I’d share a project , one of those things that keep me busy. While I try not to get sidetracked from the easel with tasks that others can do better, inevitably the DIY’er in me takes over and off I go on another adventure with tools and raw materials.
This week I’m sharing my way to build very light weight, wet panel carriers. The first couple of these were made back around 2003? or earlier… hard to keep track. I had built wood wet panel boxes in my early days of plein air painting. They were certainly bullet proof, but heavy enough to need a mule to carry them into the field. There had to be a way to construct something lightweight, and cheap… cheap being my mantra then. This was before companies like Raymar and others were in existence. So most artists had to build their own… everything. Even pochade boxes, but that’s another post. So I came up with my own. It’s built of foam core board, duck tape, basswood strips and a lot of head scratching.
If you would like to build one of these, the supplies and construction details are below. The one in the photos is 11x14, but I’ve built them in several sizes. Just adjust your measurements to what your needs are.
IN THE CARRIER I AM SHOWING HERE, I USED 1/2” FOAM CORE FOR THE SIDES. THAT’S NOT NECESSARY, 1/4” WILL WORK FINE AND NOT BE AS BULKY. BOXES I BUILT AFTER I TOOK THESE PHOTOS WERE ALL SIDED WITH 1/4” FOAM CORE.
To begin… The supplies for the wet panel carrier with links to show you the kind of supplies I’m listing, follow…
1/2” Foam core, white or black for Bottom, Ends and Lid (Top)
1/4” foam core for Sides…front and back
1/4” Basswood square dowel, available at most hobby shops, hardware and art supply stores like Blick, Hobby Lobby and Michaels.
Super Glue, any will do. Gorilla and Loctite are my choice.
Duct Tape. When I made mine only black and silver were available. Now you have an artists’ palette of designs to choose from. :)
A small hobby saw or good mat knife to cut the Basswood and Foam Core.
A sharp pencil.
Blue light tack masking tape.
Velcro
Construction and Assembly…
I suggest you write down your measurements for the entire project first. Unless you’re really good at ‘cut and go’, it’ll save you some materials and time.
First decide on the size of the panels the box will hold. Seems obvious, right?
Let’s go with the 11”x14” box. To be able to get the wet paintings in and out of this thing, you will want to give some wiggle room on each side for the panels to be able to slide in and out. This is a little tricky determining how much of an allowance to add to your measurements. We’re using 1/4” basswood to hold the panels in place so that there’s minimal rubbing on the surface of the wet painting. That doesn’t leave you much room for “slop”, so I suggest adding 3/16” to your measurements. Not all panels are created equally, some slightly smaller, some slightly larger. You could use larger basswood dowel, if you want more security in holding the panels in, but that might scrape the edges of the panel too much for you.
You will need to cut the width of the 1/4” foam core sides at 14”+ 3/16”(wiggle room) + 1” (two end pieces at 1/2” each adds 1” to the length) for a total cut size of 15-3/16” inch.
Cut the other dimension allowing for 1/2” foam core bottom and 1/2” foam core top, plus 1/8” clearance so the top closes. 11” + 1” (1/2”top and bottom) + 1/8” for a total size of 12-1/8”.
Cut the 1/4” foam core Box Sides at this dimension… 15-3/16” x 12-1/8” . You need 2.
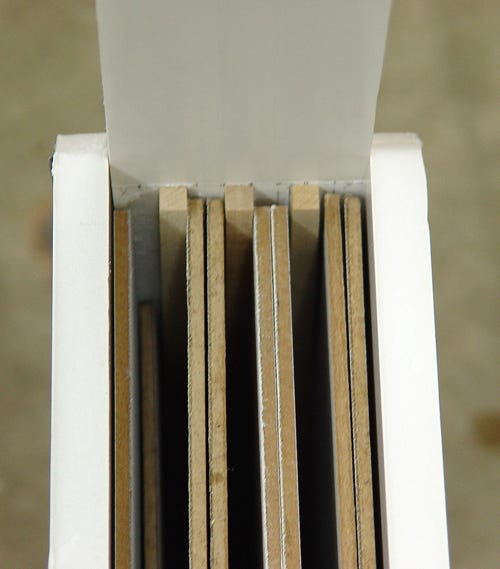
Determine how many panels you want to carry in order to measure dimensions for the sides. In the photo you can see that not all of the panels can have wet paint on them because two of them touch the sides. This box will carry 6 wet painting safely, 8 panels all together. I usually left the outside slots for extra panels and carried 4 wet ones at a time.
Add the width (how thick the panel is) of the # of panels + the width of the # of wood spacers + tolerance (I recommend 1/16”-1/8” tolerance if you use different panels from different manufacturers to allow for variance).
Added together, this measurement will be the Width of the Top, Bottom and End pieces.
Example… For a 4 wet panel box using 1/8” panels, as an example, I’d draw lines from one edge at 3/16” (panel 1/8”+1/16”)… at 1/4”(dowel)… at 3/16”(panel)… at 1/4”…(dowel)… at 3/16”(panel)… at 1/4”(dowel)…the 4th panel fits in the next space against the side.
The photo below illustrates that confusion. But, this was made for each slot to hold 2 panels, not one as in my description above. The only difference is the measurements. You can decide which way to go.
After you have decided and added all of that together… THAT IS THE WIDTH OF THE TOP, BOTTOM AND ENDS… YOUR MEASURED WIDTH.
The LENGTH of Bottom and Top pieces is 15-3/16”. (You need two, 1 for top, 1 for bottom.)
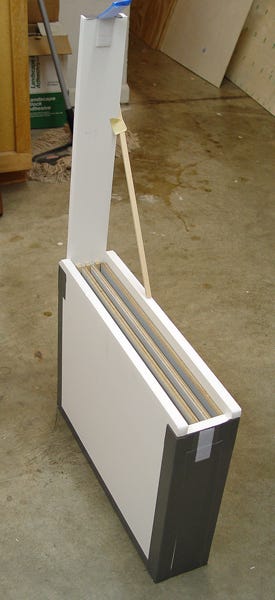
The LENGTH of the two (2) Ends is 11-5/8” ( A 1/2” is subtracted from the height of the sides to allow for the 1/2” foam core top, as seen in the photo.)
Cut the End pieces… 11-5/8” x YOUR MEASURED WIDTH.
Cut the Top and Bottom pieces… 15-3/16” x YOUR MEASURED WIDTH.
Draw parallel lines according to your measurements above, on the END PIECES that give you enough room for whatever width panels you use, and whether you’re doubling up like I did here, or just making slots for one panel each. Give your self tolerance, a 1/16” is a good start.
Last cutting to do… Cut the basswood strips the length of the panels. In this case cut them to 11” long. As many as you need for your box, a set on both ends of the panels.
ASSEMBLY
Using the super glue, run a bead along a basswood strip and lay it along one of the lines drawn. Repeat for each strip on both end pieces. I put a little < next to the side of the line that I want to glue the dowel to. A good way NOT to glue it on the wrong side of the line! It’s fast, but if you’re accurate and want faster, run the basswood strip along a sponge wetted with water first, lay on the super glue bead, and set it in place. It will IMMEDIATELY BOND. Nice trick, the water acts as an accelerator to the glue drying. Just be sure that it’s placed where it’s supposed to go, or you’re going to be starting over.
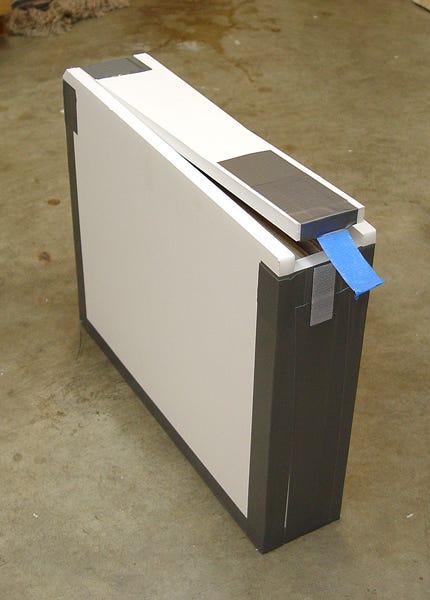
Once all of the basswood strips have been glued to the 2 end pieces, use small pieces of tape, blue tape will do so you can reposition if need be, and tack together in place. In the photos you can see how they’re placed. I tack tape the Bottom to the Sides, then the Ends to the Sides and Bottom. Create a nice square box. Once you’re happy with it, use strips of Duck Tape to secure the box. Fully cover the bottom, ends, and sides with tape. The more you cover it, the more water and damage proof it will be. I usually tape it all the way around, then go back and reinforce the seams with more tape.
Same with the top/lid… Use some duck tape to make a hinge on one side of the lid. Tape across the top, like on the sides.
I have tried Velcro to secure them, that works but only lasts for a while before it needs replacing. A good large rubber band around the top and box works too.
Helpful Hints…
If you add a layer or so of duct tape all over the box, they’re virtually indestructible for most purposes. I have had some of these that have been overseas with me, they’ve been beat up, dropped over rocks and into water, piled under easels and other supplies when packing and more. They’re very durable. If they get a little sorry looking, just add more duck tape.
Be as good as you can be at cutting the foam core at close to right angles. The more square you cut it, the easier the box will go together. Accurate measuring is a good thing here. If you are fortunate to have one, or have access to one, a frame shop type mat cutter works like magic for this. Or see if a frame shop might cut the pieces to your measurements? Knowing a friendly framer is always a good thing.
This is a lot easier than I’ve probably made it sound. Look at the photos and you can probably figure it out. I hope you found this of interest and that it gives you something else to do when you’re have all the free time in the world! (Let me know how you do that if it’s true)
Cheers,
Marc
I love seeing that other professionals make things out of foam core and duct tape! Good one - thanks for sharing.
I am far too lazy for this but it is nice to know !!